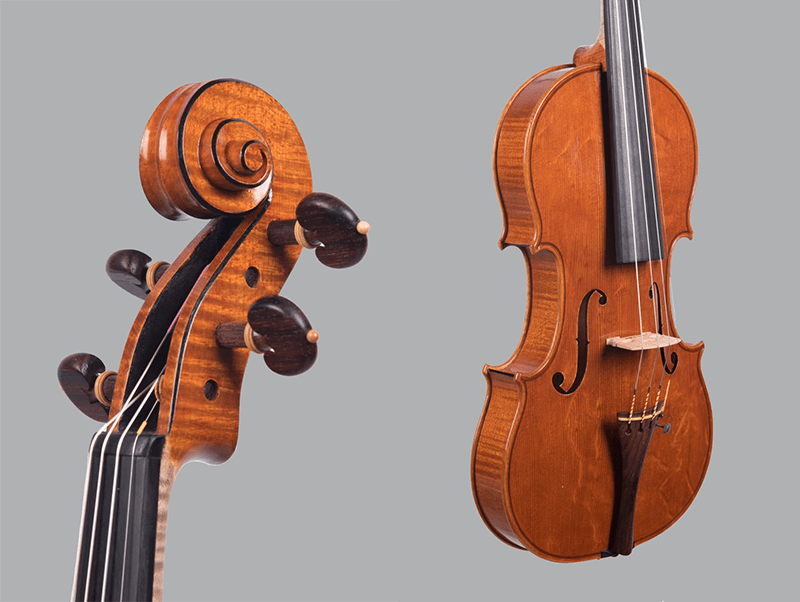
Violin Making with Lucas Fabro

Violin making at its finest! Lucas Fabro of Fabro Violins in Cremona, Italy teaches everything needed to build a professional quality violin in the traditional style using hand tools. All the steps in detail are explained. No secrets!

Buy Now $587.00 160 Lessons 37:31:51

About This Course

Welcome to the Robert O’Brien Online Violin Making Course. In this course Robert invites Luthier, Lucas Fabro of Fabro Violins in Cremona, Italy, to show how to build and finish a professional quality violin in the typical Cremonese style using methods handed down through the centuries by the Italian masters. Presented and filmed by Lucas in his shop in Italy and edited by Robert in his shop in Colorado, USA, this comprehensive course shows all the steps needed from design and raw lumber to playable instrument using hand tools and old world techniques. Lucas shows how to make your own varnish and finish in a modern and antique style. The course includes detailed dimensions, templates, pictures, tool descriptions, materials, and over 37 hours of High-Def footage documenting the entire violin making and finishing process.

This course has 160 video lessons of very detailed step by step instructions. Some chapters can be purchased separately or receive a discount when purchasing the entire course. You also become eligible to join Robert’s invitation only google chat group. Here he offers advice and support as you build. There is a wealth of information available to you for free.

Please check the FAQ page. To begin just register/login and purchase the video lessons. After purchase you will have unlimited views and may stream the videos.

Learn about:

Happy Building!

Lucas explains this so well and very simply. You know he's done this thousands of times. Irene
See what others are saying

Feedback

×
Lucas course is excellent very informative Chris
I enjoy your courses, I'm anxious to start another one. I take summer courses at Oberlin and Ashland ohio and find the streaming content far more practical and informative. I like the live contact and such but really find streaming content overall more helpful and of course repeatable. Jess
Lucas explains this so well and very simply. You know he's done this thousands of times. Irene
All of the courses I've purchased from you are top notch. Thanks again. Kenny
Good morning, my wife bought a course for me from you "Chapter one from Violin making with Lucas Fabro", and I can honestly say that I am delighted with this course, you are doing a good job, Lucas Fabro is a great luthier. Pawel
A note to let you know how impressed I was with the violin building course from Lucas Fabro. Wonderful! You guys did a great job on it. Thank you for your great work. I’ve purchased and taken a number of your courses, and have never been disappointed. You’re a valued asset to the building community. Mike Moger
I watched your promo videos, it looks very professional and detailed. The only (Violin Making) course I knew so far was a DVD collection. You take it to the next level! Congrats! Philippe
This is a FANTASTIC COURSE! The material is first rate and the Bonus files are amazing. It is well worth the time and the price if you have any interest in violin making – whether you build one or not. David
First let me say it is excellent all the instructions are clear and easy to understand. Learning from a professional violin maker it’s like you are in the room with me giving personal directions, thank you for taking the time to share your knowledge. Gerard
I purchased the course, it's wonderful Lucas. Great job! I've been looking for an online violin making course and nothing comes close to yours. Alfred
I've gotten a lot from Lucas's YouTube videos, but to see SO much more detail & explanations in this new violin course, is WONDERFUL! Even though I'm doing a cello now, the violin course still helps! Kathy
Wow! Lucas is one of the best! Henry
Corso e insegnante meraviglioso! Bel lavoro e che bella professione! Grande lutaio Lucas! Wonderful course and teacher! Nice work and what a nice profession! Great Luthier Lucas! Paco
I just signed up for it....Been watching Lucas's YouTube videos for a while now. He's GREAT!!!! I've made a few violins, just learned about Lucas this past year, just started a cello, and I keep going back to Lucas's videos for tips and knowledge. It's kind of become for me a "WWLD" experience (What Would Lucas Do?), as I've been building this cello.... Ha ha. Kathy
There is so much information in this course its unbelievable! Making varnish, carving the scroll, Amazing stuff and I am only mentioning a few things! Rolando
Chapter 1 • Model, Mould and Wood
1:24:34 $28.50 Buy Chapter
Lesson 1: Choosing the instrument model 9:37
Lesson 2: Making the templates - Part I 26:43
Lesson 3: Making the templates - Part II 14:13
Lesson 4: Making the mould 20:24
Lesson 5: Wood selection 13:37
Chapter 2 • The Ribs
4:00:21 $64.50 Buy Chapter
Lesson 1: Preparing the blocks 27:04
Lesson 2: Thicknessing and marking the blocks 8:09
Lesson 3: Shaping the C blocks 20:05
Lesson 4: Preparing the ribs 19:47
Lesson 5: Making counter blocks 5:02
Lesson 6: Bending and gluing C bouts 16:57
Lesson 7: Shaping the upper and lower bout blocks 21:49
Lesson 8: Bending upper and lower bouts - Part I 20:22
Lesson 9: Bending upper and lower bouts - Part II 18:08
Lesson 10: Sanding the ribs 9:35
Lesson 11: Preparing the linings 10:41
Lesson 12: Preparing the blocks for the linings 9:44
Lesson 13: Bending the linings 23:57
Lesson 14: Gluing the linings 7:05
Lesson 15: Making linings flush with sides 5:59
Lesson 16: Smoothing the ribs 15:57
Chapter 3 • Top and Back Prep
1:22:49 $17.50 Buy Chapter
Lesson 1: Preparing the wood 15:20
Lesson 2: Joining 31:03
Lesson 3: Preparing the plates 14:29
Lesson 4: Drawing the outline 8:44
Lesson 5: Cutting the outline 6:01
Lesson 6: Border height 7:12
Chapter 4 • Roughing Out Top and Back
2:39:53 $39.50 Buy Chapter
Lesson 1: General concepts on arching and molds 8:46
Lesson 2: Roughing out (Gouge) 40:37
Lesson 3: More roughing out (Gouge) 27:46
Lesson 4: Roughing out (fingerplanes) 14:49
Lesson 5: Border thickness 17:43
Lesson 6: Border thickness (back) 18:45
Lesson 7: Roughing out the edges 10:14
Lesson 8: Making the edges 9:24
Lesson 9: Making the corners 11:49
Chapter 5 • The Purfling
1:25:17 $28.50 Buy Chapter
Lesson 1: Testing 4:54
Lesson 2: Drawing the channel 11:30
Lesson 3: Cutting the channel 18:52
Lesson 4: The corners and bee sting 6:11
Lesson 5: Bending the purfling 7:14
Lesson 6: Adapting the purfling 19:40
Lesson 7: Gluing the purfling 16:56
Chapter 6 • The Arching
2:25:07 $28.50 Buy Chapter
Lesson 1: Sguscia 5:17
Lesson 2: Making the sguscia 26:27
Lesson 3: Rough arching 20:10
Lesson 4: More arching 17:29
Lesson 5: Arching with fingerplane 33:55
Lesson 6: Refining the arching 22:29
Lesson 7: Final arching 19:20
Chapter 7 • Back Thickness
1:21:50 $28.50 Buy Chapter
Lesson 1: Marking the outline 5:42
Lesson 2: First lets rough out top 13:31
Lesson 3: Carve out with gouge 5:35
Lesson 4: Carve out with fingerplane 29:58
Lesson 5: More carving 12:39
Lesson 6: The final thickness 14:25
Chapter 8 • The Top
1:30:02 $56.50 Buy Chapter
Lesson 1: F holes template 9:02
Lesson 2: Positioning the F holes 7:54
Lesson 3: Cutting the F holes 8:03
Lesson 4: More carving out with fingerplanes 28:56
Lesson 5: Preparing the bass bar 6:13
Lesson 6: Positioning the bass bar 7:26
Lesson 7: Fitting the bass bar 7:35
Lesson 8: Gluing the bass bar 5:18
Lesson 9: Shaping the bass bar 9:35
Chapter 9 • Closing the Sound Box
1:35:41 $28.50 Buy Chapter
Lesson 1: Flattening and rounding 16:25
Lesson 2: More rounding of borders 17:37
Lesson 3: Removing the mould 13:35
Lesson 4: Shaping the linings 7:11
Lesson 5: Shaping the blocks 9:30
Lesson 6: Gluing the back 12:08
Lesson 7: Finishing the inside 7:14
Lesson 8: Gluing the Top 8:19
Lesson 9: Tea time 3:42
Chapter 10 • Soundbox Finishing
1:06:04 $28.50 Buy Chapter
Lesson 1: Remaking the sguscia 17:33
Lesson 2: Rounding the edges 7:10
Lesson 3: Finishing with Scrapers 9:11
Lesson 4: The saddle 15:01
Lesson 5: Horsetail 17:09
Chapter 11 • The Scroll
4:58:29 $76.00 Buy Chapter
Lesson 1: Preparing the wood 11:14
Lesson 2: Drawing and cutting outline 13:18
Lesson 3: Truing end of neck 6:44
Lesson 4: Preparing the scroll 32:55
Lesson 5: Drawing the shape 16:56
Lesson 6: Cutting and first turn 29:20
Lesson 7: Roughing out first turn 24:26
Lesson 8: The second turn 14:13
Lesson 9: The third turn 11:12
Lesson 10: More scroll work 14:30
Lesson 11: Chamfers 12:53
Lesson 12: Finishing the turns 25:41
Lesson 13: Under throat 6:24
Lesson 14: Drill peg holes 5:39
Lesson 15: The peg box 32:34
Lesson 16: Fluting 40:30
Chapter 12 • The Fingerboard
1:07:54 $28.50 Buy Chapter
Lesson 1: Selecting the wood 3:09
Lesson 2: Fingerboard mould and template 6:24
Lesson 3: The sides of the fingerboard 10:45
Lesson 4: The back of the fingerboard 5:31
Lesson 5: The fingerboard radius 14:05
Lesson 6: Fingerboard head and tail 4:57
Lesson 7: The internal curve 15:06
Lesson 8: The nut 4:29
Lesson 9: Attaching the fingerboard to the neck 3:28
Chapter 13 • The Neck
3:12:49 $56.50 Buy Chapter
Lesson 1: Neck overview 2:36
Lesson 2: Roughing out 13:47
Lesson 3: Neck curves 44:53
Lesson 4: Measurements 4:10
Lesson 5: Marking 13:38
Lesson 6: Fittng the neck joint 34:51
Lesson 7: Final fitting 15:24
Lesson 8: Shaping the button and heel 16:14
Lesson 9: Gluing the neck joint 18:38
Lesson 10: More shaping and finishing 28:38
Chapter 14 • Varnishing
5:54:39 $109.50 Buy Chapter
How to make varnish - Part I 20:45
How to make varnish - Part II 19:22
Lesson 1: Ground color and sealer 17:15
Lesson 2: Applying varnish 11:49
Lesson 3: Adding color 8:37
Lesson 4: Adding a second color 14:40
Lesson 5: More varnishing 11:26
Lesson 6: Evening the color 10:31
Lesson 7: Leveling 15:32
Lesson 8: More varnish coats 9:58
Lesson 9: Retouching 15:18
Lesson 10: More transparent varnish 2:29
Lesson 11: Second leveling 6:10
Lesson 12: Unvarnishing the borders 30:43
Lesson 13: More transparent varnish 4:24
Lesson 14: Black chamfers and more varnish 20:09
Lesson 15: Level, retouch and more varnish 7:59
Lesson 16: Micromesh 8:31
Lesson 17: French polish 17:32
Lesson 18: Final varnish and fingerboard 13:16
Lesson 19: Polishing 10:51
Lesson 20: Antique Finish - Ground color and sealer 1:26
Lesson 21: Antique Finish - Adding varnish 1:48
Lesson 22: Antique Finish - Adding color 9:57
Lesson 23: Antique Finish - Adding more varnish 4:13
Lesson 24: Antique Finish - Removing varnish 19:31
Lesson 25: Antique Finish - Rounding and marking 19:12
Lesson 26: Antique Finish - Tempera 8:20
Lesson 27: Antique Finish - Sanding and shellac 8:03
Lesson 28: Antique Finish - French polish 4:52
Chapter 15 • Setup
3:05:07 $73.50 Buy Chapter
Lesson 1: Pegs and end pin 22:04
Lesson 2: The tailpiece 9:37
Lesson 3: The soundpost 25:57
Lesson 4: The bridge legs 13:57
Lesson 5: Nut slots 12:28
Lesson 6: Fingerboard edge 11:40
Lesson 7: Finishing neck and fingerboard 14:33
Lesson 8: Pegbox and F holes 12:58
Lesson 9: Bridge and nut adjustment 21:52
Lesson 10: Bridge thickness and shaping 28:10
Lesson 11: Strings and pictures 11:51
Chapter 16 • Bonus Videos
21:15
Lesson 1: Tools 13:00
Lesson 2: Museum 3:45
Lesson 3: Violin sound clip 1 1:48
Lesson 4: Violin sound clip 2 1:42
Lesson 5: Violin sound clip 3 1:00
Lesson 6: More info on arching 13:44